Latest Posts

Thai Fish Cakes with Coriander, Lime Mayo

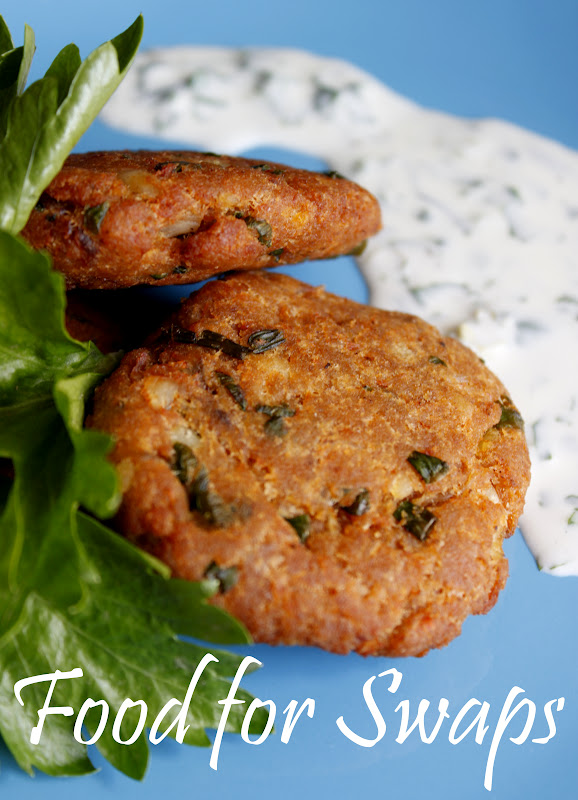
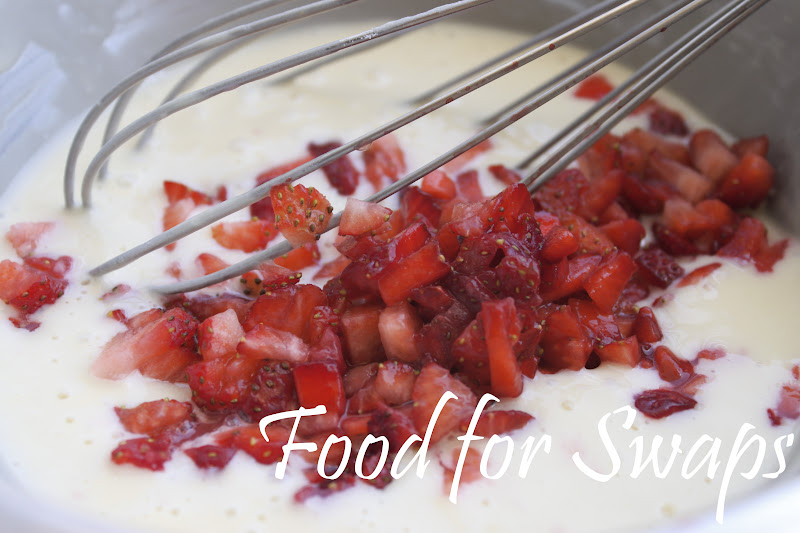
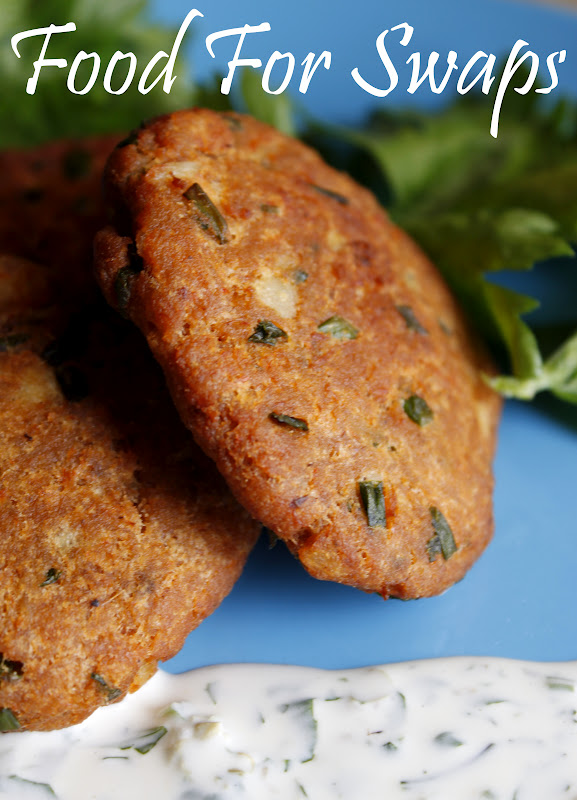
I love fish cakes. Especially the ones made with Sear fish. Sear fish is a delicacy in South India and Sri Lanka and is generally the costliest fish in the market after Pomfret. In Andhra Pradesh and Tamil Nadu it’s called “Vanjaram” and in Kerala its christened “Neimeen”. Some people also refer to them as king mackerels. I am partial to the seer, because a. it’s an ocean fish, b. it cooks beautifully in a curry or a fry, c. It’s isn’t riddled with too many bones, d. It’s so tasty! My mom-in-law makes the best fish cutlets (south Indian style with loads of masala!) and the co-resident can’t stop eating them. Since I can’t compete with the mother recipe, I din’t try to replicate it. Instead I found one that uses thai red curry paste to give a fantastic spin to the basic fishcake recipe. It’s really simple to make. You can even make the cakes in advance and refrigerate them, just pull out and fry before serving. Now isn’t that what we all strive to do? – reduce time in the kitchen and increase time actually savoring the dish! Though I guarantee this will get over the minute it hits the plate from the frying pan. Kŏr hâi jà-rern aa-hăan! (That’s Bon Appétit in Thai :P)

Thai Fish Cakes
Prep time: 10 mins
Cooling time: 30 mins
Cooking time: 10 mins
Makes: 8
What you need:
100 gms Sear fish fillet (poached)/ 100gms can of flaked Tuna
2 Tbsp Thai red Curry paste (I used Real Thai)
1 tsp Vegetable Oil
¾ cup chopped Spring Onion
2 Medium Potatoes (skinned, boiled and mashed)
1 cup fresh Breadcrumbs
Oil for deep frying
To serve:
½ cup Mayo
Juice of 1 lemon
¼ cup finely chopped cilantro
Salt and pepper
What to do:
Poaching the fish: Place the sear fish in a saucepan and pour just enough water to cover the fish.  Season with salt and pepper. Bring liquid to a simmer over medium heat. Simmer 7-8 minutes or until center is opaque and fish flakes easily when tested with fork. Remove fish with slotted spatula. Keep aside. (If you are using a can of tuna, then you can omit this step).
Remove bones from fillet. (there is generally just one big bone). Flake the fish into a big bowl. Fry the thai red curry paste in a teaspoon of oil for 3 mins. Add the paste, spring onions, potatoes and bread crumbs to the fish. Combine gently to bring the ingredients together. Divide into 8 portions and shape into flat, round cakes. Chill for 30 mins.
Meanwhile combine the mayo, cilantro and lime. Season with salt and a dash of black pepper. Chill in the refrigerator.
Now fry the fish cakes in oil, over a medium heat until crisp and golden. (Medium heat is important otherwise the outside will burn while the inside remains uncooked). Drain on a paper towel. Serve the hot fish cakes with the cool lime and coriander mayo. Fantastic!

Fluffy Sponge Cake and a Trifle Pudding

Sponge cakes are so called because they are as fluffy as a sea sponge. The air incorporated into the batter lifts the cake to make it light and irresistible. Since it is used as a base for many other desserts it’s one of the first cake recipes that I wrote down in my little black book of Baking! (Yes, I have one – though the color is more navy blue than black). There are many variations to turn out a perfect sponge. I use the method which involves creaming the eggs and sugar and adding the melted fat in the end. Some people use oil instead of butter, but I always think butter makes everything better, so you know my leanings! You can eat the sponge cake like a Victorian Sandwich – jam and whipped double cream or use it for a rolled cake like a Swiss Roll. (The flexibility of a sponge cake allows us to roll it without breaking).  I have used it as a base for the popular English Trifle. Now the Trifle is nothing but a combination of layers of cake, custard, fruit and cream. But it is an impressive looking dessert to turn out! I use ready mix custard and jelly which saves me time. You can also go ahead and use a ready cake as the base of the trifle. (I won’t tell anyone!) But it’s so cost effective and easy to make at home, that I desist buying some from the bakery. Once you have all the ingredients, a trifle pudding is just assembly – though you have to wait a trifle between steps. Like George Savile said, “A man who is a master of Patience is a master of everything else”. (I don’t think he had a wife…’master of everything else’ ….hmph!) J
Fluffy Sponge Cake
Prep time: 20 mins
Cooking time: 25 mins
Serves: 4 (makes one 8X8 inch cake or two 20cm round cakes)
What you need:
4 eggs
¾ cup (165 gms) Caster Sugar
1 cup (150 gms) Flour
1 ½ tsp Baking Powder
½ tsp Salt
1 tablespoon Cornflour
10 gms (2 teaspoons) Butter, melted and cooled
1/3 cup (80 ml) Hot Water
What to do:
Pre-heat oven to 180°C for a normal oven or 160°C for a fan-forced oven. Grease one 8×8 inch square cake pans, and line the base with baking paper. (Baking paper makes it easy to remove the sponge cake – other be prepared to lose large chunks to the pan).
Beat eggs in a bowl, using an electric mixer, for about 10 minutes, until thick and creamy. Gradually add sugar, beating until dissolved. Triple-sift flour, baking powder, salt and corn flour together and fold it into the egg mixture gently.  (Folding in flour and other ingredients can be tricky when you use a spoon or spatula, but you can use your fingers to pull the dry ingredients up and through the egg mixture).
Combine the melted butter and the water, pour it down the side of bowl and fold through gently
but thoroughly. Pour mixture into the pan and bake for about 25 minutes. Immediately turn out the sponges to cool, top-side up, onto a wire rack covered with baking paper. Cool and use as you please.  
Basic Trifle Pudding
What you need:
4 cups Vanilla Custard (Prepared from 500ml milk and 3-4 tbsp Custard packet mix)
2 cups Jelly (prepared from 1 packet – I used Rex)
2 cups fresh Cream whipped with 3 Tbsp Sugar
1 Sponge Cake Base
2 cups of mixed Fruit (strawberries, cherries, pineapples, apples, grapes)
What to do:
In a big glass bowl, layer the sponge cake at the base. Put the jelly in as the next layer. Now top with fruits. Pour custard over. (It’s better if the custard is thick rather than runny…helps hold the trifle’s shape better). Now lightly top with whipped cream. Decorate with fruit slices/ sprinkles. Ready to serve!
Note: You can also make individual portions of trifle, much easier to serve!

Green Goddess Frittata (Spinach, Broccoli and Mushroom)

Frittata is a variation of an omelette and is derived from the Italian word fritto meaning to fry. The difference between an omelette and frittata are four fold. (A) Ingredients are combined with the beaten egg mixture before cooking, unlike an omelette where its tossed on top before the omelette is fully cooked. (B) The mixture is cooked over a very low heat, but for a longer period of time (10-15 mins) compared to an omelette (4-5 mins). (C) The frittata is not folded over like an omelette, but grilled briefly to set the top (D) and finally a frittata is for sharing, unlike an omelette which is a one person dish. So after getting all technical on you, I’d like to conclude by saying – it tastes just like a fat, fancy omelette or a baseless quiche. Both of which are fully acceptable and appreciated with gusto in my home. I would serve the frittata cold with some toasted baguettes for a fuss free lunch. It’s also a great option to lug around for a picnic. I call this one Green Goddess – with Spinach, broccoli and mushroom, how could I have not?
Spinach, Mushroom and Broccoli Frittata
Prep time: 10 mins
Cooking time: 20 mins
Serves: 2-3
What you need:
3 Tbsp Olive Oil
80 gms Broccoli florets, chopped
200 gms Button Mushrooms, sliced
2 cups Spinach leaves, coarsely chopped
6 eggs
A splash of soy sauce
Salt and freshly ground Black Pepper
2 Tbsp grated Parmesan Cheese
What to do:
Heat the oil in a large non stick frying pan. Add the mushrooms and broccoli and cook over a high heat s, stirring, for about 7 mins. Add the spinach and sauté for 1-2 mins. Lower the heat, do not let the spinach wilt.
Break the eggs into a bowl, season with salt, pepper and soy and beat well. Pour over the veggie mix in the pan and cook over medium heat for 10 mins. As the eggs set, lift the frittata with a spatula and tilt the pan so that the uncooked egg runs underneath. Repeat till the whole frittata looks set.
When the eggs are set sprinkle with grated parmesan and place the pan under the grill. (about 4 inches from the heat). Cook for 1-2 mins or until the top is golden brown and firm when pressed. Cut into quarters and serve with freshly toasted and buttered baguettes and a nice glass of wine.
Note 1 : Use a frying pan that can be placed in the oven as well. Or else you need to transfer the frittata into an oven proof dish to grill the top.
Note 2: Non Veggie Option: Reduce the olive oil to 1 Tbsp and add 60 gms of diced bacon and sauté the veggies in the bacon fat. Omit the soy sauce, as the bacon will provide the requisite saltiness.

Summer Pasta Salad – a la Infinitea

I’m more of a summer person than a winter person. Or so I thought, till I got baked in the sun the past couple of days. The heat has been unbearable. I have the fan on full speed at home and there’s still no respite. Being Bangalorean, I always think I don’t need an AC in our pleasant city. Boy, am I wrong! The only time I’m happy these days, is when I’m in the car and I have the AC on full blast in my face or when am under a cold shower! Which leads me to change my earlier notion of what weather person I am – I am an opti-weather person. I don’t like it too hot or too cold, too dry or too rainy, too windy or too still! I’m not fussy, but that’s the weather I would like. If wishes were horses, right? But I still concede that when it comes to satisfying my weather requirement, no other city in the world gets it as close to perfect as Bangalore. It’s almost like my genes have adapted to the city of my birth and the thermostat has been set to ‘comfortable’. Speaking of comfortable, I went to my old hangout Infinitea last week. Lazing around on their sofa’s, ordering a pomegranate ice tea and summer pasta salad and chatting with the girls. Can’t get more comfortable than that! I adore their version of the summer pasta salad (which is more of a main course in my opinion) and tried to replicate it at home. Results? A very comfortable match!

Summer Pasta Salad
Prep time: 30 mins
Cooking time: 15 mins
Serves: 4
What you need:
350 gms Penne
3 Peppers (1 red, 1 yellow, 1 green), finely chopped
1 small Onion, finely chopped
6 cloves of garlic, minced
3/4 cup Corn Kernals
100 gms Mushrooms, finely chopped
1 Tbsp chopped Jalapenos
1 Tbsp chopped Sun dried tomatoes in oil
2 Tbsp chopped Green and Black Olives
2 Tbsp Olive Oil
1 Tbsp Butter
200 ml Cream
Salt and freshly ground black Pepper
To garnish:
Grated Cheddar Cheese
Mixed Herbs
What to do:
Julienne the peppers and then chop them up into tiny pieces. Ensure that the onions and mushrooms are also chopped to roughly the same size. Try to cut up the olives, jalapenoes and sun dried tomatoes to the same size as well. In the meantime, boil the corn and set aside.(I used the microwave).
In a large saucepan, heat the olive oil and toss in the butter. When the butter sizzles, lower the heat and add the onions. Saute for 2 mins till it gets soft. Raise the heat. Then add the garlic and the mushrooms and saute for another minute. Toss in the peppers, saute for 3 mins. Finally add the corn, stir to combine.
Now lower the heat and add the cream. Cook for a minute and toss in the jalapenoes, sun dried tomatoes and olives. Season with salt and pepper. Mix to combine and Turn off the heat.
Spoon the pasta into a serving dish. (it helps if its microwave friendly). Now toss the grated cheese on top and heat for 30 secs in the microwave till the cheese is melty. Season with mixed herbs and serve!
P.S. You could add in the juice of 1 lemon in the final stage of seasoning to make it more tangy.

Ice Cream Sandwiches for Milestones and Hot Days

I’ve always been bewitched by Ice Cream Sandwiches. Not many companies made it and on the rare occasions that I would get to eat it; I was always in awe that ice cream could be held together by two cookies! They are very popular in Singapore (being one degree above the equator, that’s fair enough!) and that’s where I had one, every day of my trip. No exaggerating! There, they use wafers to make the sandwich but I much prefer the cookies…so much more yummy! A very popular flavor there is Durian ice cream sandwich. The fruit may stink like old socks but the ice cream tastes divine. Summer just kicked in last week and the Bangalore heat has gotten as bad as Singapore this year. No really, we were at 35 degrees yesterday! The heat made me crave for the ice cream sandwiches. After looking for them in most ice cream parlors and turning up negative, I made them myself. (Not the ice cream darlings, bought that one). And since this is the month I got married in and the co-resident and I completed five years of being together, I dedicate the (cheesy) heart shaped ice cream sandwiches to him. Ha ha ha , I can just imagine him going red in the face… well, he can cool off with an ice cream sandwich can’t he?

Ice Cream Sandwiches
Prep time: 30 mins + cooling time
Makes: 10 sandwiches
What you need:
500 ml Ice Cream slab (I used Amul Vanilla)
For the chocolate cookies:
100 gms All purpose flour (Maida)
¼ tsp Baking powder
¼ tsp Baking soda
20 gms Cocoa powder
40 gms Butter
50 gms Powdered sugar
1 Tbsp Water
What to do:
Sift flour, baking powder, baking soda and cocoa powder together in a medium sized bowl. Chop butter into small chunks. Beat butter and sugar until light and fluffy. Now add a tbsp of water to it and beat for few mins more. Add the dry ingredients mixture in two parts and beat with an electric mixer on low speed until the mix is incorporated and rolls into a ball. Now wrap the cookie dough in a cling film and refrigerate for 10 mins.
Preheat the oven to 180°C. Remove the dough from refrigerator. Sprinkle some All purpose flour on your working surface and roll out the dough into a 1/4 inch thick rectangle. Use your cookie cutters to cut out shapes. (I used a heart… ahem ahem… go ahead and laugh, it looked cute!)
Place the cut out cookies on a baking tray and bake for 12-15 minutes at 180°C. Let the cookies cool on wire rack for a while and store in air tight container
Assembling the Ice cream sandwich: Bake the cookies. Place one cookie (under side facing up) on a plate. You need to work really quickly in the coolest part of the kitchen now. Cut a slab of ice cream as thick as you want the sandwich to be. (I used ¾ inch). Quickly cut the ice cream using your cookie cutter and place the shaped piece on top of the cookie and sandwich it with another cookie on top. Now quickly transfer it to the freezer for it to firm up. (I used a Tupperware box lined with butter paper to store the ice cream sandwiches).
Serve chilled just out of the freezer 🙂

Strawberry Griddle Cakes for a Fancy Breakfast

Yes, I know it’s another recipe with strawberries back to back. But I have so many in my fridge that I need to use them and use them in innovative ways! (lest the co-resident realize my evil plan of ‘waste to wealth’). I have a supermarket weakness. If something looks fresh, is in season and the store has a buy one get one free offer – I’m hooked. Rest assured, I will be carting loads of it back home! Come on now, who doesn’t like a good bargain? Thankfully Strawberries are such accommodating fruit that you can pair them with almost anything and achieve success. Now coming to Griddle cakes. First of all, don’t let the name take you on a wild goose chase. Another name for a frying pan is a griddle and griddle cakes are nothing but pancakes that are just a little firmer. So you can call them Strawberry pancakes if you please… but I much prefer the fancier sounding name. (Fools the co-resident into thinking he’s getting something radical to chew on!) I served the Griddle cakes with some strawberries in wine instead of the routine ‘drizzle the pancake syrup on’. And since that means I’m having wine for breakfast, it automatically becomes a fancy brekkie! (Ok, so I have low expectations…Sue me!)

Strawberry Griddle Cakes with Strawberries steeped in Wine
Prep time: 30 mins + cooling time
Serves: 4
What you need:
125 gms self raising Flour
1 pinch Cinnamon and Salt
½ tsp Baking Powder
30 gms Castor Sugar
1 Egg
1 Lemon, juice of
125 ml Milk
150 gms fresh Strawberries, diced
Salted Butter
For the Strawberries in Wine:
200ml Rose Wine
1 tsp Vanilla essence
50 gms Castor Sugar
200 gms fresh Strawberries, sliced
What to do:
To make the Strawberries in Wine: Heat the wine and sugar in a large pan until the sugar dissolves. Bring the liquid to a boil toss in the strawberries, take off the heat. Add the vanilla essence, cover the pan and set aside for the fruit to steep in the liquid until cool.
To make the griddle cakes: Sift the flour, cinnamon, salt and baking powder in a large bowl. Stir in the sugar. Make a well in the center and tip in the egg, milk and lemon juice to make a batter. Add the diced strawberries to the mix. Mix well till small bubbles appear on the surface of the batter.
Heat a non stick frying pan and add a little salted butter. Add spoonfuls of the batter to the pan to make small thick pancakes. Cook on medium heat until bubbles start to appear on the surface of the griddle cakes – about 2 or 3 mins. Flip and continue to cook for another 2-3 mins. Repeat with the rest. Serve warm with the wine steeped strawberries.
Note: If cooking in batches, keep the cooked ones warm in a low oven while you finish the rest.

Strawberry Milkshake and My 100th Post

It’s my 100th post today. I can’t believe I had enough material to go this far (apparently I do!) Bloggers say that lasting the 2 years is the biggest challenge. You need to be interested in what you blog about and let’s face it, people need to be interested in what you write about. You might say that you give a rat’s ass about what people think…but that’s not true. You need an audience to appreciate art. (Ok, in my case … the art of blabbering!) If nothing else, I have at least 100 failsafe recipes that I can always fall back on! I’ve also come to realize that I care as much,  (if not more) about my pictures that accompany each blog post. So the journey for me has been about taking baby steps to produce pics that I am proud of. (Here’s the link to my first post and picture. (Click Here) No, am not ashamed, it’s a learning curve right?) 😛

Talking of learning curves, was I going to put up some insurmountable culinary challenge as my 100th post? Hell No! Most of the inspiring recipes for me are ones that you look at and decide instantly, “I can make that …tonight or right now”. It’s recipes that look simple and delicious and goad you into thinking that you can create them with a flourish of your hand. So here’s the Strawberry Smoothie recipe. No fuss, all Love!
P.S. Thanks for stopping by…

Strawberry Smoothie
Prep time: 10 mins
Serves: 2
What you need:
200 gms fresh Strawberries
400 ml of Milk, cold
2 scoops of Vanilla Ice Cream
2 Tbsp of Sugar
What to do:
Take the green tops off the strawberries (he he he!), Wash them under running water. Toss them in a blender with the Sugar and whir around for 3 mins till you get a lovely red puree. Now Add the ice cream in and blend for 1 min. Finish by adding the milk in and run the blender for 2 more mins till you get a nice and frothy mix. Check for sweetness. (you can add more sugar if you want at this point – what are you like carzy??)
Pour into a tall glass and enjoy making a milk mustache!
I love this pic below… Something about it makes me feel like I’m floating on a cloud 🙂

Easy Vanilla Cupcakes with Nutella Frosting

Once you get the basics right then everything else is a breeze. My first cupcake was a vanilla cupcake. Somehow adding the chocolate as an additional step made it feel like advanced baking! Now here’s the best part. I made my first cupcake (in my whole life) in March last year! After which I’ve been stuck with the cupcake bug and been driven to try all kinds of mini joys. So now you know that I wasn’t born with a ladle in my hand nor did I have supreme baking talent. The key to success is the 3P’s – Practice, Practice, Practice! (Like the joke – Rumor is that a pedestrian on Fifty-seventh Street, Manhattan, stopped Jascha Heifetz (the greatest violinist of our time) and inquired, “Could you tell me how to get to Carnegie Hall?” “Yes,” said Heifetz. “Practice, Practice, Practice!” So there you go … if I can bake, so can you. And starting you off is this Basic Vanilla Cupcake Recipe. And just to add some pizzazz, we have a nice and easy Nutella frosting. Have fun!

Easy Vanilla Cupcakes with Nutella Frosting
Prep time: 10 mins
Baking time: 20 mins
Makes: 10-12 cupcakes
What you need:
½ cup unsalted Butter, room temperature
2/3 cup granulated Sugar
3 large eggs, room temperature
1 teaspoon pure vanilla extract
1½ cups Maida or cake flour
1½ tsp Baking powder
¼ tsp Salt
¼ cup Milk, room temperature
For the frosting:
5 Tbsp Nutella
2 Tbsp Milk
What to do:
For best results,  follow the method in the given sequence as is. Pre-heat the oven to 170 degree C. Grease or line your muffin tin with paper cups. Sift together the flour, baking powder and salt. This ensures that all the three dry ingredients mix evenly and removes lumps.
With an electric mixer or hand mixer, beat the butter for 1-2 minutes. Add the sugar and beat until light and fluffy, about 3 minutes. Start with a low speed and increase to high speed. This process incorporates maximum air bubbles, making the cupcakes, soft and airy.
Add the room temperature eggs, one at a time. Beat the mixture until smooth after each egg, about 30 seconds. If the mixture curdles, stop adding the eggs, beat until smooth before adding the remaining eggs. If you do not add room temperature eggs, the volume of the baked cupcakes will reduce. Add the vanilla extract. Beat for 2 minutes.
Now slowly beat the sifted dry ingredients into the mixture in three batches, adding the room temperature milk between each flour batch. Start and end with the flour. Scrape down the sides of the bowl as required, and ensure that the batter is evenly mixed. Do not over beat.
Fill ½ to 2/3 of the cups in the first muffin tin. Bake for 17-20 minutes. Insert a toothpick into one of the cupcakes in the oven and ensure it comes out clean. Remove and cool on a wire rack.
Now beat the Nutella with the milk until you have the consistency of hot fudge. Pipe or spread the frosting on the cupcakes once they have cooled completely. Simple and delish!
P.S. Click here for another version of the vanilla cupcakes. This current recipe makes a lighter, fluffier cupcake, whereas the older one is more moist. Take your pick J