Latest Posts

Bruschetta a la Italia – Red, White and Green

This appetizer is so packed with flavor and color and taste, that it’s always a hit at a party. It doesn’t even need any cooking! So if you want to impress with minimal effort and maximum style – this is the one for you. I call it ‘a la Italia’ because once I assembled it, I realized that it had Red, White and Green. I was giggling away to myself very bemused, that an Italian dish must encompass the colors of the Italian flag – hence the christening.

Bruschetta (bru-sket-ta) is a very popular starter to an Italian meal. Though many people assume that bruschetta is bread topped with tomato and Basil and olive oil (that’s a popular topping), it is actually just roasted/ toasted bread rubbed with garlic and some olive oil. You can top this up with interesting combinations and have a fun start to a meal. I always have Pesto and Sun Dried tomatoes at home, so this combo was a no breezer for me. I also picked up some lovely bocconcini (mini mozzarella balls) to top it all off. So without further adieu, I give you Bruschetta a la Italia.

Bruschetta with Pesto, Sun Dried Tomatoes and Mozzarella

Prep time: 10 mins
Serves 6
What you need:
1 French Baguette/ Ciabatta, sliced horizontally (about 12 slices)
4 Tbsp Pesto
4 Sun dried tomatoes, sliced
6 Bocconcini Balls, sliced
¼ cup Olive Oil
4 cloves Garlic
Salt and freshly ground Black Pepper to taste
What to do:

Slice the baguette and toast till a light golden brown. Rub with a clove of garlic and drizzle some olive oil on top. Now spread some pesto on it. Top with sun dried tomato slices and bocconcini. Season with Salt and Pepper. Serve with aplomb!

Flame Grapes and Green Apple Salad

Yes I’m trying to show off and no the grapes are not on fire. That’s just a name for a variety of grapes that are both white and red in colour. Quite pretty really. They are also seedless and firm. Perfect for use in a salad. The tang of the green apple superbly complements the sweetness of the grapes and we bring it all together with some lovely lemon herb mayonnaise dressing.

Now I, (like most people) was not a very big fan of salads in the younger days of yore. We even called it Ghas Phoos. (Those who know, will know!). But now that’s I’ve grown older wiser, I gladly fill up my plate with the goodies. I’ve even been known to order just salad for lunch! (Ha ha ha … really got you on that one din’t I??) Anyway, the point I’m trying to make is … some salads do taste awesome! And though you probably won’t bypass a meal to eat just one, it won’t hurt to pile some on your plate. Besides this is almost a cheat salad – it has more fruit than the leafy stuff!


Flame Grapes and Green Apple Salad

Prep time: 10 mins
Serves 2

What you need:

1 cup of seedless Grapes (flame/ globe)
1 Green Apple, cut into wedges
1 big bunch of Mixed Lettuce Leaves
2 Tbsp Mayonnaise
1 Tbsp Lemon Juice
½ tsp of mixed dried herbs (oregano, rosemary, thyme)
Salt and freshly ground Black Pepper to taste

What to Do:

Wash and dry lettuce leaves. (I have a salad spinner *smug*). Now combine the mayo, lemon juice and herbs in a small glass bottle. Shake well (with the lid on) to combine. You can also substitute sour cream for mayo. Season with salt and pepper and serve immediately.

Note: Always add the dressing on just before serving a salad. This will ensure the leaves are not limp and soggy but fresh and crunchy.

Marble Cake and An Ode to Casa Piccola

This might be very Bangalore centric but I’m sure anyone who’s seen one of their favorite/old eateries shut down, can connect to what I’m saying. Casa Piccola has be serving Bangalore fun and affordable European cuisine from 1979 and the Devtha Plaza location was definitely all the school and office goers favorite. If there was one place I remember frequenting as a kid for burgers and pizza’s and spaghetti – it was Casa’s. Many a date has been arranged here, with the friends sitting at the next table and sniggering away, while the poor boy was left wondering whether he did something wrong! If there is one restaurant that I’ve actually eaten every dish on the menu – it was at Casa’s. We even knew the waiters by name and some of them have worked in the establishment forever and a day. My favorite dish was Pasta Fungi – Pasta and mushrooms in a white sauce. (As a child with limited French vocabulary I was afraid to order it because I assumed Fungi = plural of Fungus!). My other top orders were the Sloppy Joe Burger (open face burger with ham and mushrooms covered with sauce), Epinard Ala Crème (A spinach bake covered with mashed potatoes) and Pasta Tetrazzini (Pasta in a cheesy red sauce)! The desserts were always fun and the Profiteroles and the Marble cake with ice cream 🙂 topped the list!
The restaurant downed it shutters last month and I went there and tried and ate everything that my stomach could stomach! It was the only way a foodie can ever say goodbye to their favorite haunts. It’s sad to see commercialization gobbling up parts of Bangalore that we hold dear and Casa’s joins the elite list with India Coffee House, Victoria Hotel, Premier Book store and Airlines drive thru. But old Bangaloreans will remember… and this is my ode to you.
Marble Cake
Prep time: 20 mins
Baking time: 45 mins
Makes: one 8 inch round cake
What you need:
125 gms Unsalted Butter
¾ cup Caster sugar
2 Eggs, lightly beaten
1 tsp Vanilla essence
2 cups Flour
2 ½ tsp Baking Powder
A pinch of Salt
½ cup Milk
2 Tbsp Cocoa Powder + 1 Tbsp Milk
Red/Orange food coloring
What to do:
Preheat oven to 180°C. Brush a deep 8” cake tin with butter; line the base and sides with butter paper.
Using an electric beater, cream butter and sugar in a medium mixing bowl, till light and fluffy and pale. Add the eggs one at a time, beating thoroughly after each addition. Add essence, beat until combined.
Using a metal spoon, fold in the sifted flour, baking powder and salt in three batches, alternating with the milk. Start and finish with the flour. Stir until just combined and smooth.
Divide the batter into three bowls. In the first, mix in the sifted cocoa and 1 Tbsp Milk, combine till smooth. Add enough food colouroing in the second batch to give it a nice pink/ orange flush. Leave the third bowl plain.
Now, drop spoonfuls of alternating colours into the prepared cake tin until all the mixture has been used up. Draw a skewer or knife through to swirl the colours. Bake for 45 mins or until a skewer inserted into the center comes out clean. Leave the cake in its tin for 10 mins before turning onto a wire rack to cool. Eat warm.
Say a little prayer for Casa Piccola before you tuck in with some Ice Cream!

Note: This is a Basic Butter Cake recipe. So if you don’t want a marble cake, just omit mixing the cocoa and coloring in. The rest of the process remains the same.

Grilled Chicken Souvlaki

It’s been a Greece obsessed month. Started with Tzatziki, then to the Cucumber Cooler and now to the famous Souvlaki. Maybe it has more to do with summer and the fact that Greek cuisine is so suited for hot balmy weather. When you scrutinize their cuisine, it’s filled with light and fresh recipes packed with flavor. Lemons are abundantly used, as are olives, yoghurt, herbs and cheese. Souvlaki is actually Greek fast food – Meat on a skewer. But unlike the fast food of the west (burgers and fries), this one is a lot more healthy, wholesome and delicious! Greeks generally use pork/ lamb for souvlaki but chicken is popular as well. The grilled skewers can be eaten as a starter or combined with Pita, tzatziki, lettuce and tomatoes to make a super sandwich! The most refreshingly light and filling lunch for a hot day! Now to complete the picture ….I’m on a Greek island overlooking the aquamarine ocean and have a gorgeous Greek God for company …. Sigh! (Yes, I remember I’m married already, but a girl can day dream can’t she?!)

Grilled Chicken Souvlaki
Prep Time: 10 mins
Marinade time: 30 mins
Cooking time: 15 mins
What you need:
500 gms Boneless Chicken breast
Olive Oil for basting
Marinade:
4 cloves garlic, minced
1 Lemon, Zest and Juice
2 tsp Oregano
1 tsp Thyme
1/2 tsp Chilli flakes
1 tsp Salt
1 tsp freshly ground black pepper
2 Tbsp Yoghurt
1 Tbsp Cream
1 1/2 Tbsp Olive Oil
What to do:
Soak bamboo skewers. Mix the marinade ingredients in a medium sized bowl. Use thick yoghurt to ensure it is not too runny. Flatten the chicken breast and cut diagonally into strips of 1″ width. (You should get about 4-5 strips per breast). Toss the chicken strips into the marinade and mix well. Marinate for 30 mins or longer in the fridge.
Preheat the grill for 10 mins or heat charcoals till red hot. (I used my oven – ran the grill function for 10 mins to get it to the desired heat, before putting my skewers in). Now skewer the chicken strips in a wave onto the bamboo sticks. (This allows for maximum area to be exposed to the grill.) Baste with olive oil. (I used a spary can. So much fun!) Place the skewers on a wire rack with a dripping pan below and grill for 15 mins, turning once in between to baste. Check for doneness. Take off the heat and serve with some warm Pita bread, Onion rings, tomatoes, lettuce and Tzatziki (Click here for recipe)!

Mango and Bocconcini Skewers

As it’s Mango season in India, I thought I’d pay homage to the king of fruits by featuring him in a simple recipe that lets his flavours shine through. Apparently the reason (which I found out only last week) the Mango is called the ‘King of Fruits’ is because kings in ancient India used to pride themselves on the possession of large mango gardens. They were also highly prized in Ayurvedic healing and cooking. They balance all the three doshas. A Mango is ready to eat when it is soft to touch and yields to gentle pressure. Green mangoes can be ripened at room temperature, however once ripe store them in the refrigerator and eat them within three days.

The best use of a mango is to savour it by itself or eat it with a dollop of fresh cream. (My favourite type is Alphonso and Begampalli). If you want to take it up a notch, then read on. This appetizer recipe is of a different kind – A no-cook but full of flavor one! It also contains a few of my favourite ingredients – Mangoes, Bocconcini and Balsamic Vinegar. The combination is insanely delicious! The sweetness of the mango, set off by the tartness of the balsamic and finally amalgamating both is the creaminess of the bocconcini…Divine!

Mango and Bocconcini Skewers
 

Prep time: 10 mins
Makes: 8 skewers
 

What you need:
1 ripe Alphonso Mango, skinned and cut into cubes
8 Bocconcini Balls (or Fresh Mozarella torn into bite sized chunks)
8 fresh Mint/ Basil leaves
3 Tbsp Balsamic Vinegar, reduced by half
 

What to do:
Wash the Mango and cut into three parts, vertically and on either side of the stone. That leaves you with two fleshy halves. Now score the flesh upto the skin (but not cutting through) in a checkerboard pattern. Now put your fingers under the skin and push to turn the mango flesh up. It should look like a fruity porcupine! Now it’s super easy to cut away cubes without wasting any flesh.
Heat the balsamic vinegar in a saucepan on low heat and reduce the quantity by half.
Now skewer a piece of mango, followed by a ball of bocconcini, mango again and topped with a mint/ basil leaf.
Serve on a plate with balsamic drizzled on the side or on top. Simple, elegant and a dynamite of flavours in your mouth. Love!

Aqua De Pepino – Cucumber Cooler

Featured in Tastespotting.com on 14th June 2012.
No, the cooler does not taste vegetal. If anything, it’s brilliantly refreshing. And this was the recipe that I said, you could make side by side with the Tzatziki. (It’s such a waste to be throwing away fresh cucumber juice!). Or if you’re in no mood to grate, strain, squeeze and extract the juice of one cucumber – just use prepackaged cucumber juice. (Though I strongly recommend the fresh version – the colour is unbelievable!). You can either use vodka or a gin with this recipe, substituting one for the other brings no great change in taste. If you are a teetotaler or are making this for a younger audience, by all means skip the alcohol. It’s just as exciting to serve on a balmy summers eve.

 Aqua De Pepino – Cucumber Cooler

Prep time: 10 mins
Serves: 2

What you need:

400 ml Cucumber Juice (from 2 Cucumbers)
5 tsp Sugar Syrup
120 ml Vodka
2 Lemons (Juice of)
Lemon and Cucumber slices to garnish
Ice Cubes to serve

What to do:

Wash, peel and cut the cucumber in half. Scoop out the seeds. Now grate the cucumber coarsely and spoon into a strainer. (Do this to remove the water from the cucumber. Collect the cucumber juice and reserve. After you are fairly certain that you have pressed out as much water from the cucumber as possible – press into strainer again. Surprised? Yes there will still be some more cucumber juice you can extract. Reserve.

In a cocktail shaker add the vodka, lemon juice, sugar syrup and cucumber juice. Mix well. (Don’t shake it too much to avoid the cucumber juice from frothing). Now strain into a whisky glass filled with ice cubes. Toss in some cucmber and lemon slices for a fun cocktail. Enjoy.

Here’s what was featured in Tastespotting.com

Zomato Restaurant Guide 2012 – A Review

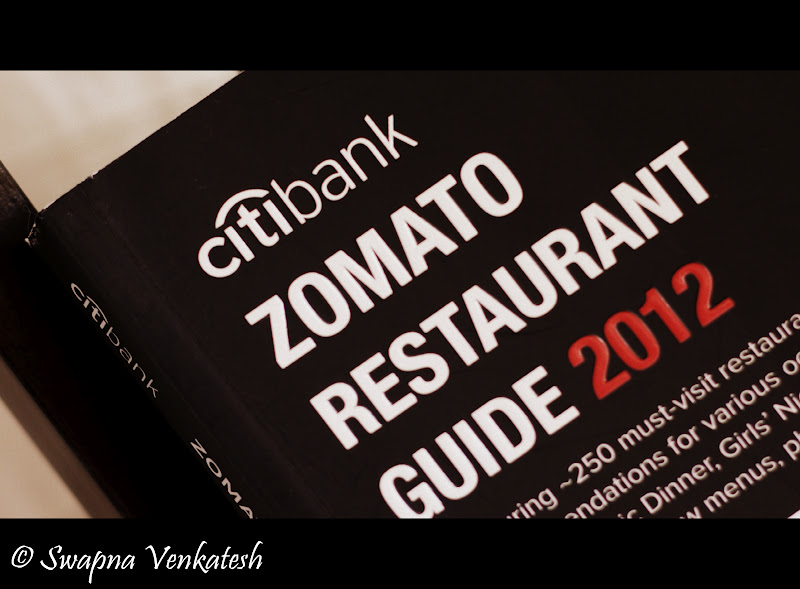
The kind people of Zomato sent me the “Zomato Restaurant Guide 2012” (Bangalore) this week. Considering this is their first attempt at publishing a physical food guide and my first attempt at writing a book review – let’s hope the Gods will be kind.

I buy food guidebooks religiously every year – even though I place them on a bookshelf and use them as paperweights once I’ve read them cover to cover. (Yes, I do read a guidebook – just like a cookbook it can transport me to a food wonderland). The reason for ignoring them after aquring them (just like men and the chase!), is that – searching online for a restaurant is so much simpler. (brunch+indiranagar+continental >hit enter). The reason most guidebooks are cumbersome, is because they are not ready-answer-providers. They are directories, with tiny little lettering that one has to frown over with a microscope to get your pick. So has Zomato solved that riddle? Let’s find out.

First impressions – the book looks good. The paper quality is nice and glossy (compared to most other review books where the pages are so thin you can see through them – reminds me a lot about yellow pages!). Zomato is associated with Citibank for this book and it’s only obvious that a few pages will be dedicated to Citibank promotions and restaurants tied up with the same. (But who’s complaining when someone highlights discounts?).

After a quick note about Zomato.com (They claim it’s the largest electronic restaurant guide in the country serving more than 3 million users every month) and another one pager from the editor about how this book aims to “distill the best of the website in an innovative and user friendly form” – I was ready to dive right in.

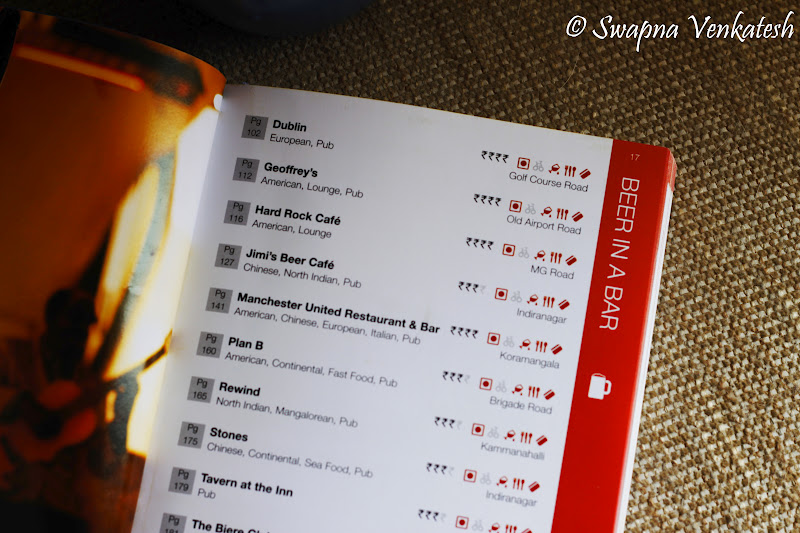
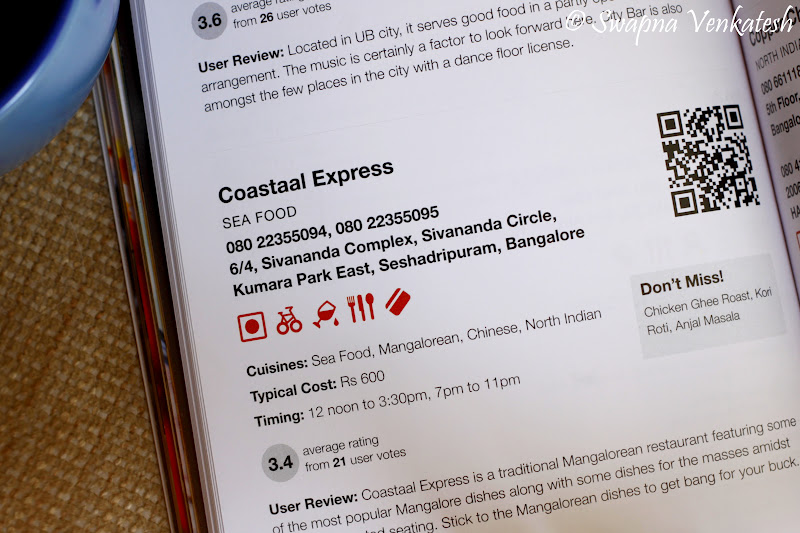
When you are deciding on which restaurant to visit, the general areas of elimination and deduction are cuisine, price, location, Veg/Non-veg (just thought about my veggie friends) and if it serves alcohol. (Legally or illegally!) If you are leafing through a guide book, you would go to the index and then narrow down choices by cuisine and then keep flipping back and forth to figure out the rest of the details. This is where the Zomato folks have done a clever thing to differentiate themselves from the pack. The first few pages are like a ready reckoner of frequently asked questions when we start to look for a restaurant. They have 22 categories (Eg: Beer in a Bar, Catching Up, Sunday Brunch, Kid Friendly etc.) and restaurants tagged to those. Next to each restaurant name is a bunch of logos which will give you more details about the cost, whether they accept Credit Card (Citibank darlings!), whether they serve alcohol or they have home delivery. I might not readily agree with their choice of restaurants in most of their categories, but at least they are headed in the right direction!
 
 
The rest of the book is the standard fare of restaurants listed from A-Z and further details. This irks me because there is no grouping by area or cuisine. Even the index fails me here, because it’s just the exact list from the body of the book (minus details) with page numbers next to it! Huh??? The purpose of an index is to cross reference – so give me some intelligence in this area! Maybe the next edition will have a split by area (CBD, Kormangala, Bangalore North etc.) which will make it much simpler to navigate the 100 odd pages. What I would really like though is a split by area and then cuisine! I can hear the Zomato folks groaning here. Ok, ok I get it … I’ll hit the website for such detailed distillations!
Now that I battered them with the stick, its time to offer the carrot. Other guide books shy away from giving restaurant’s ratings or recommending the best dish there, in order to appear impartial. Zomato, I see, has no such qualms! That’s because they’ve used the user’s ratings from their website and this absolves them of all sin. The users are not the Big Bad Corporation, but people like you and me. Now, we can always go into a lengthy debate about sample size and quality, but at the end of the day – I like to gauge the general opinion of a place before heading out. Another helpful inclusion from Zomato is their ‘Don’t Miss’ box. It gives you a list of the must try/ most popular dishes at that restaurant. And now my favorite feature – I love the fact that they have a QR code next to every restaurant listed! What’s a QR code you ask? Well it’s a nifty little code that lets smart phone users scan it and view the restaurant’s menu on the Zomato portal. So geeky cool! *clap clap clap*

So would I pay 200 bucks to buy this off the shelf? For a comprehensive listing of every restaurant in every nook and corner in Bangalore – No. For a friendly nudge from a group of fellow foodies to try something that they have, and loved – Yes. And the QR code doesn’t hurt either!

To buy the book from Flipkart click here. Here’s the link to their website http://www.zomato.com/

Tzatziki – Cucumber Yoghurt Dip from Greece

It’s pronounced zad-zi-ki, in case you were wondering. I do have a penchant for strange sounding names, they intrigue me and force me to delve deeper into them. And this dip is something that you want to dive deep into. Especially on a hot summer day! It’s really refreshing and cooling and goes fabulously with vegetable crudités or grilled meat. After making it, I served it with some olives and toasted pita for a mezze like feel. And announced with a flourish that the Tzatziki was served! Mom took a look at it and declared that it was not really that exotic or strange, actually it reminded her of the ubiquitous Indian raita or pachadi! Nothing like ‘experience’ to throw water on someone’s excitement! (hmph!). I of course brushed the comment aside with a cool wave of the hand and grumbled that she was closed to experimenting with new cuisines (all the while knowing that I had lost the battle!). So in essence, yes it does look and feel like pachadi and maybe the Greeks were our distant cousins and swapped recipes. (one global village huh?) But that doesn’t take away from the fact that its bloody delicious and makes for one fabulous dip!

Tzatziki

Prep time: 20 mins + refrigeration
Makes: 2 cups

What you need:

2 med Cucumbers
500 gms thick Yoghurt (I use Nestle set dahi)
4 cloves Garlic, crushed
1 tsp finely chopped Dill
1 Tbsp Olive Oil
Salt and Freshly ground Black Pepper
To serve:
Vegetable crudites
Olives
2 Pita Breads
2 Tbsp Olive Oil

What to do:

Wash, peel and cut the cucumber in half. Scoop out the seeds. Now grate the cucumber coarsely and spoon into a strainer. (Do this to remove the water from the cucumber. Collect the cucumber juice and reserve – I made a fabulous cocktail with it later. Recipe in next post). After you are fairly certain that you have pressed out as much water from the cucumber as possible – press into strainer again. Surprised? Yes there will still be some more cucumber juice you can extract. (I got 400ml of gorgeous green cucumber juice from 2 cucumbers). Now the grated cucumber is ready to go into the dip. (Note: You can also strain the yoghurt to make the dip creamier).

In a medium bowl add the cucumber, yoghurt, dill, garlic and olive oil and mix well. Cover and refrigerate till use. (Some people leave it overnight to develop the flavor). My impatience reduced overnight to till I toasted the pita bread …. The dip tasted fine!

Preheat oven to 180°C. Cut through the center of the pita bread. Brush the rough sides with olive oil. Now cut each circle into 8 wedges. Bake bread on ungreased tray for 10-15 mins or until crisp. Serve with olives and tzatziki!