Latest Posts

Ham, Bacon and Green Apple Quiche

So today has been a frustrating day. I made a cheese cake which did not set and made a Mexican Chicken Mole which had too much cinnamon! And on a hot day tempers can flare everywhere! Clearly some days are not for culinary adventure or rather just any culinary venture. Every woman who rushes home from work and still wants to whip up a fancy meal a la Nigella, is living in a dream world if she doesn’t have failsafe recipes to fall back on! It’s times like these that I have even more reverence for a good recipe, a blogger who tests the recipe and finally a book that publishes only tried and tested recipes. That is why you can be rest assured I am not putting up dubious recipes on my blog. I don’t want to inflict the pain of failure on anyone. (No, seriously, that’s how it feels when a recipe screws up!) So it’s with supreme confidence that I am posting the Ham, Bacon and Green Apple recipe. It worked liked a charm, tasted supremely good and was a breeze to make. Now who doesn’t want that in their repertoire?

Ham, Bacon and Green Apple Quiche
(Recipe adapted from BBC Good Food India, Jan 2012)
Prep time: 20 mins
Baking time: 25 mins
Serves: 4
What you need:
8 Ham slices
8 Bacon slices
½ Green Apple, halved and sliced
2 Eggs
200ml Cream (I used Amul)
1 large Onion, sliced
A pinch of Nutmeg
1 cup dried Breadcrumbs
50 gms Butter, salted
6 Sage leaves, chopped finely
Handful of grated parmesan
Salt and Pepper to taste
What to do:
Put the breadcrumbs and softened butter in a food processor and mix till you get wet pasty crumbs. Now empty the contents into a 8 or 9 inch flan/pie dish and press the mixture to coat the bottom and sides. Pat down with your fingers to get an even layer and use your knuckles to push the mixture into the sides. Cover with cling film and toss into the refrigerator to chill while you make the quiche mixture.
Stack the ham slices up and cut into large squares. Chop the Bacon into strips and cut the apple and onion into slices. Add the bacon to a large skillet and sauté over low heat to render the fat. Cook until the bacon just begins to crisp. Now add the onions and sauté in the bacon fat, then add the apple slices and sauté till both turn translucent.
Add the cream and bring to a simmer, season with salt and pepper and a pinch of nutmeg. Remove the skillet from the fire and let it cool for a few minutes.
Preheat the oven to 180°C. In the meantime, beat the eggs. Now add the eggs to the skillet and mix well into the sauce. Take the pie dish out of the fridge. It should look dry. Pour the contents of the skillet into the baking dish and sprinkle sage leaves on top. Bake at 180°C for 20 mins in the center rack of the oven. Now remove from the oven, sprinkle grated parmesan on top and return to bake for another 5 mins till the crust looks golden brown.
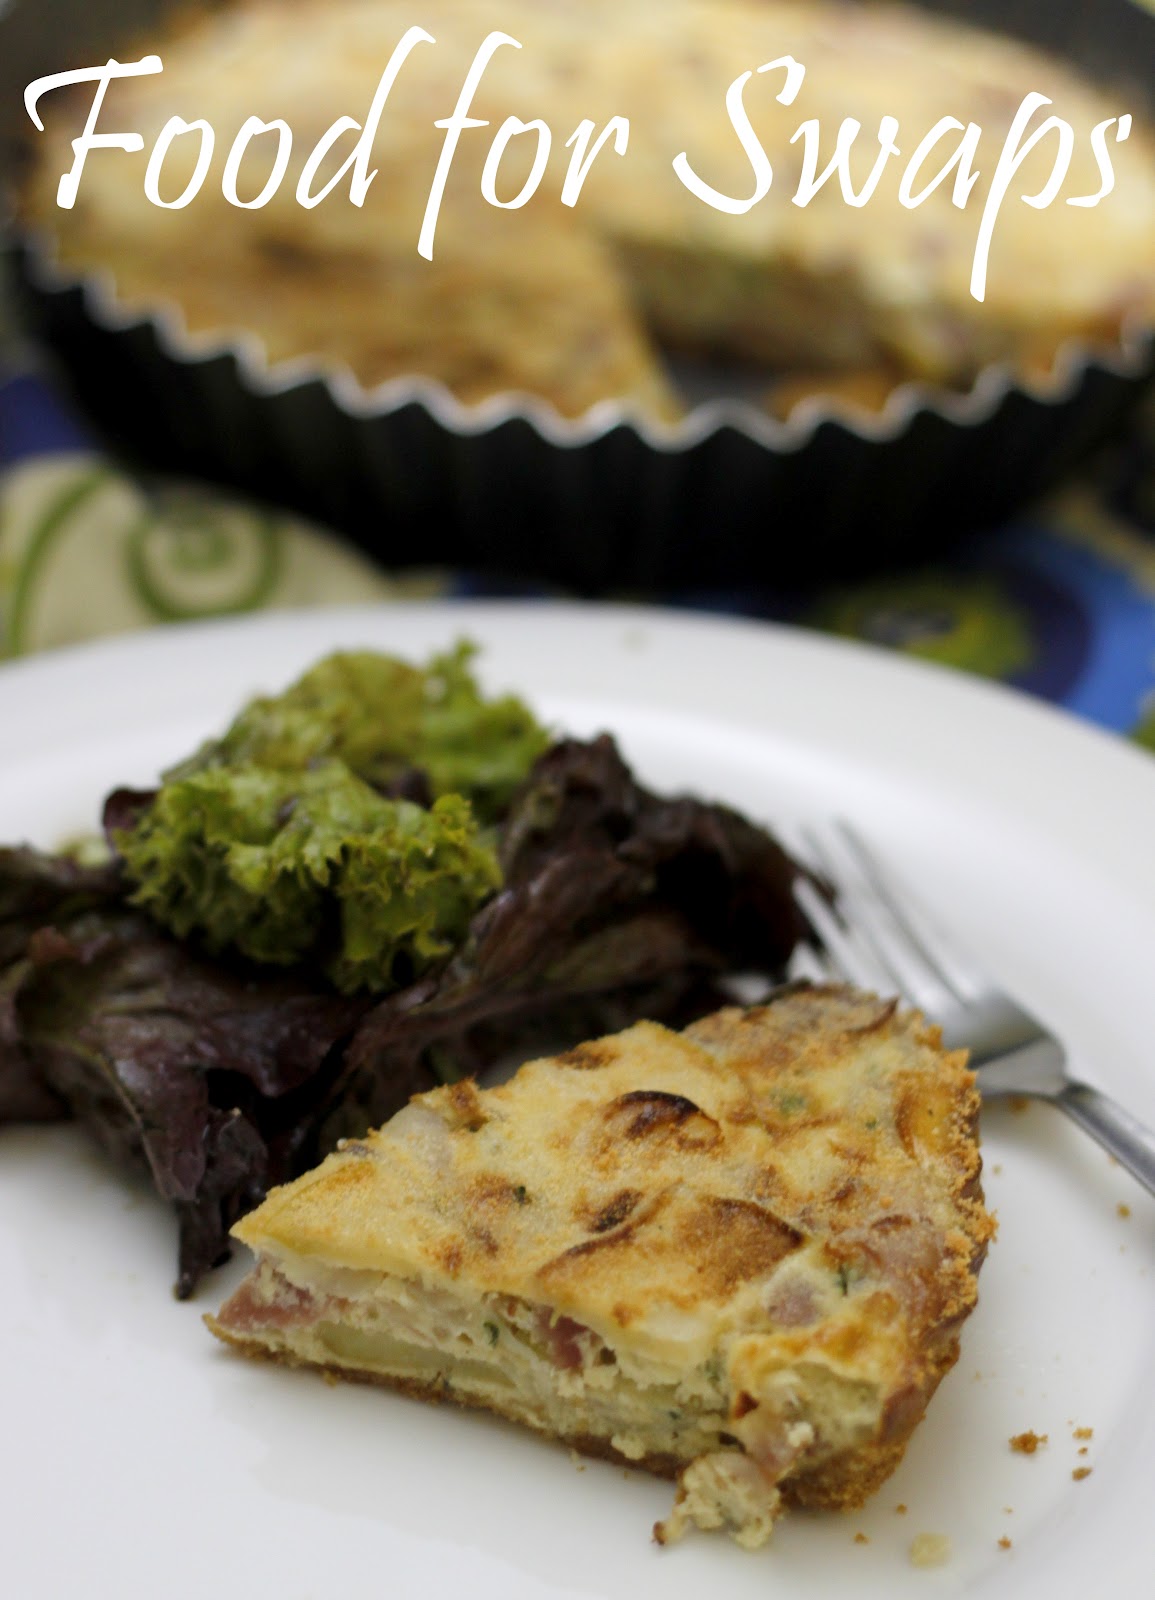
Serve hot immediately or chill overnight, cut into neat wedges and serve at room temperature or warm. I served mine with a nice green salad with balsamic dressing for a fantastic mid week meal!

Cafe Frappe with Bailey’s

I am not a coffee drinker. (Phew! That was almost as difficult as admitting that you have an alcohol problem!) Coming from the state of coffee growers – Karnataka, (my brother-in-law even owns a coffee plantation), I am quite an anomaly. When I go to visit my relatives or friends and they offer me a cup of coffee, I’d rather say I just had a meal, than admit I don’t drink coffee. On the rare occasion that I do tell someone, they look at me like I am some sort of space alien and repeat the question till I give in. There… now their world is sane again! So why don’t I drink coffee? I like to believe that I already have so much energy, that I don’t need the buzz from coffee. I also never appreciated the bitter taste of coffee and sweetened it till it started to taste like sugar syrup! Now coming to the big question, If I don’t like coffee, why do I have a recipe for Café Frappe on my blog?? I like to think of Café Frappe as a non-coffee… more like a little chilled dessert. I get all nostalgic thinking about the first Cyber Café’s that opened in Bangalore in 1997. They used to serve Café Frappe – a foam covered iced coffee drink. It was all the rage then. Every single teenager worth their salt would hang out in a Cyber Café and sip Café Frappe! It was tres cool. And obviously I wanted to fit in, so I would order in anyway and sip it so slowly that no one would realize I hadn’t finished it by the time we left the place. Replicating this at home was quite simple; the nostalgic feeling came sweeping back! And then to get back to the present, I added a shot of baileys to my second glass… Isn’t it fun being an adult? 😛
Café Frappe with Baileys
Prep time: 10 mins
Serves: 2
What you need:
1 ¾ cup Cold Milk
½ cup Ice Cubes
2 Tbsp Instant Coffee Powder (I used Nescafe Classic)
½  cup water
4 Tbsp Sugar
60 ml Bailey’s Irish cream Liqueur
To Serve:
1 cup fresh whipped cream or canned whipped cream
½ tsp Instant coffee powder
1 Tbsp Chocolate sauce
What to do:
Brew 2 Tbsp coffee powder with 1/2 cup boiling water. Set aside to cool/ refrigerate.
Blend milk, brewed coffee and sugar in a blender till you get a foamy, creamy texture. Pour in the baileys and whip for 5 seconds.
To serve: Divide the ice cubes between two glasses. Now hold the serving glass in your hand, take half a tbsp of chocolate sauce (I used Hersheys) and let it dribble onto the inner walls of the glass. Slowly fill the glass with the cold coffee leaving about an inch on top. Top this with whipped cream and sprinkle some coffee powder onto it. Serve with a straw and spoon to eat up the whipped cream. Restaurant style Cafe Frappe with a bailey hit!
P.S. For an U18 version you can just skip the baileys, it still tastes good!
Note: I used ready whipping cream (Toplite)  but you can make fresh whipped cream at home by beating a cup of heavy whipping cream and 1/4 cup of sugar using an electric mixer until a stiff creamy texture is formed. Add this to your icing cone and top your cold coffee. Feel free to adjust the sugar level and black coffee according to your taste.

Sun Dried Tomato Pita-Pizza

Featured in Tastespotting.com – 19th Mar 2012
I know I have a penchant for extremely long, all-encompassing titles to the post. But trust me this one is the modified version of the original title, which was – Sun Dried Tomato Pita-Pizza with Ham, Mozzarella and Basil. When I read that, it struck me that the entire recipe was in the title itself. Wow! My job is done right? Just chuck whatever I told you onto the pita and bake it in an oven. No really, Pizza making is that simple! (If you’re not kneading the dough that is – which I am not. I don’t have the arms for it!) I also am not rich enough to invest in a Kitchen Aid, so I will be cheap and buy some readymade pizza bases and get the job done. No one has to know! I know the true blue Italians are turning in their graves, but honestly who has the time to appease everyone these days?! My motto is to ‘get the job done’. I’m pretty partial to the thin crust variety but no one sells them at the bakery, so I improvise and use Pita bread as the base. No, I’m not insane. It works as a fantastic substitute. Also even though the 3 hour reduced pizza sauce is marvelous, my sun dried tomato instant pizza sauce is such a good imitation, that no one will be able to tell the difference! The rest as they say is history, or rather my-story. Cheesy? Well a pizza has to be 😛

Sun Dried Tomato Pita-Pizza
Prep time: 10 mins
Cooking time: 10 mins
Serves: 4
What you need:
4 Med Pita Breads
8 sundried Tomatoes in Oil
4 Tbsp Tomato sauce
100 gms Ham slices
200 gms Mozzarella, grated
Handful of Basil leaves
Salt and Pepper to taste
Dried herbs to garnish
Red Chilli flakes for added heat

What to do:
Grind the sundried tomatoes along with the tomato paste and 5 basil leaves to make an instant pizza sauce. Add in 2 Tbsp of the reserved sun dried tomato oil, mix well and keep aside. Check seasoning.
Divide the rest of the ingredients into four portions. Now spread one portion of the pizza sauce on the pita bread. Top with one portion of ham slices and mozzarella. Garnish with some basil leaves. Bake/ Place under a preheated grill for 8-10 mins till the cheese melts and is all bubbly. Season if required. Repeat with the other three pitas. Serve hot, sprinkled with some dried herbs (oregano, parsley) and red chilli flakes for added heat! Voila.
P.S. Go ahead and use pepperoni instead of Ham. That’s a different kind of heaven!

Here’s what was featured in Tastespotting.com

Simple Chicken Curry for Complicated Days

There are days that are easy, breezy and simple. And there are days that can grate on your nerves that burrowing your head deep into a pillow seems like the only way out. Unfortunately, even that option is but a distant dream when you have to finish gazillion things in the limited span of 24 hours. It’s not every day that I spin through life in a haze. I actually like my little routines of measured slowness. (Now the definition of slow for an Aries can be very different from the rest of the world, but nonetheless!). And there have been more days than I can count on my fingers, that ordering takeaway is the norm. But when everything seems to be spinning out of control, I crave desperately for a home cooked meal. (Mommy…can I come home?). Oh wait, driving there is going to take me a good part of an hour, eating there another, and driving back another hour! I can’t spare three hours in a time strapped continuum.
Famished, cranky and hungry is not the way you should be cooking anything, but if I’m in that zone there’s no better dish to cheer me up than Simple Chicken Curry. This one takes twenty minutes of monitoring and thirty minutes of bubbling away contentedly on the stove by itself. And what’s more, it tastes like a giant hug! (Yes, food can give you a hug…. Never tried it??). I just spoon some onto a heap of fluffy white rice and finish the meal with a massive dollop of yoghurt! Bliss! If not anything else, it gets me through the complicated day being less famished, less cranky and less hungry J  
Simple Chicken Curry
Prep time: 10 mins
Cooking time: 40 mins
Serves: 4
What you need:
800 gms skinless Chicken pieces
1 large Onion
2 Med Tomatoes
1 Tbsp Ginger-garlic paste
2 Tbsp Oil
1 pinch granulated Sugar
1 tsp Chili powder
2 Tbsp thick/ Greek Yoghurt
1 tsp Garam Masala
1 handful of fresh Coriander, chopped
Salt to taste
What to do:
Peel and finely chop the onions. Chop the tomatoes. Pour the oil into a large pan set over high heat. When the oil is hot add the sugar, to caramelize and give the curry a rich color. (No, we don’t use food colouring at home… unless you want to stain your fingers!). As the sugar caramelizes toss in the onion and fry until it starts to brown. Next, add the ginger-garlic paste and sauté. Toss in the tomatoes, chili powder and turmeric. Lowerr the heat and fry for atleast 5 minutes till the pungent smell of masala’s mellow and you see the oil separating from the paste. (About 5 mins). If the paste starts sticking to the bottom of the pan, add a Tbsp of water.
Next stir in the chicken pieces. Turn the heat back high and sauté to seal the chicken on all sides, mixing it well with the masala. Now add the yoghurt and sauté well. When the chicken starts to turn white all over, lower the heat to medium, add half a cup of hot water to the pan, cover with a lid and cook for 20 mins.
Remove the lid and cook uncovered for another 7-10 mins to thicken the gravy. Finish by adding garam masala and salt to taste. Garnish with coriander leaves. Serve with hot white rice and yoghurt.

Cherry Chocolate Muffins and Love as I know it…

Yes, we all know Valentine’s Day is around the corner. And though I personally don’t do cart wheels because of it (overrated to say the least!), it does make me think about Love. It’s a bit like this Muffin. Don’t give up on me yet… I know not everything is about food, but the comparison makes it easy for me to rationalize the subject in my head! I started out with a recipe for this muffin from a completely trusty source. The recipe seemed simple and the pictures were gorgeous enough to make me want to try it right away. So I dived headlong into it. The results were ‘nice’ but I felt sorely cheated. Not because it din’t taste good or look divine, it just din’t hit the spot like how I pictured it in my overly imaginative mind. So did I mope around whilst eating it, knowing all well that this is not what I wanted? Hell no! I knew the ingredients were right but the quantities didn’t add up. So I rolled up my sleeves and played around with the proportions till it felt just right. Then I baked it… and voila … muffins like I wanted – light, fluffy, cherry filled awesomeness!
So coming to my point about muffins and Love.  Lots of people will tell you what ideal Love is and paint you glory pictures while they’re at it. You’ll dive headlong into it and when match the following doesn’t work – come out disillusioned. (Insert expletives!) Here’s where I step in and give you my two cents. (Backed by 10 years of being in love with one man – ok, in and out :P) The ingredients for love are the same. A little bit of passion, lots of respect, loads of understanding, truckloads of generosity and some space to be yourself, blah blah blah. Each one needs to work out the proportions themselves. What’s good for the goose may not always be good for the gander! And you need to work at it… it’s never going to be ‘perfect’ the first time. (It’s not called a ‘labour’ of love for nothing!) And when you get it right, finally – you can sit back and enjoy a muffin or two together. (P.S. you don’t have to labour to get this muffin right… I’ve done it for you this time!) and ….Happy Valentine’s Day!
Cherry Chocolate Muffins
(Recipe inspired from Sin-a-Mon Tales)
Prep time: 25 mins
Baking time: 20-22 mins
Makes: 12
What you need:
1 cup Flour
¾ cup powdered Sugar
¼ cup plus 1 Tbsp Cocoa Powder
1 tsp Baking Soda
½ tsp Baking powder
½ cup Milk
1 tsp Vanilla Extract
1 Egg
¼ cup Vegetable Oil
½ cup freshly brewed Hot Coffee
¾ cup pitted Cherries, halved (I used the ones in Syrup)

What to do:
Preheat the oven to 180°C. Line the muffin tins with paper liners and set aside. Sift the flour, sugar, cocoa powder, baking powder and baking soda into a big bowl. In another bowl whisk the egg with the oil till well incorporated and airy. Now add the Milk and vanilla essence and give it a quick whir. (I use an electric whisk). Now slowly add the wet ingredients to the dry and run the mixer on low speed to just combine. Scrape the bowl with a rubber spatula to being the ingredients to the center. Now add the coffee and run the whisk for a 30 secs to combine all the ingredients. (The batter will be runny… don’t worry). Fold in the pitted halved cherries. (Or you could add them when you pour the batter into the muffin cups).
Distribute the batter into 12 muffin cups, filling each one 2/3 full. (I added my cherries in stages while filling the batter). Bake for 20-22 mins, or until a toothpick inserted into the middle comes out clean. Wait till completely cooled to enjoy their true flavor.

Inspired by Sin-A-Mon’s Black Forest Muffins

Anda Raita and the Art of Perfect Hard Boiled Eggs

Two opposites do not make a whole or so said some really intellectual dude. The reason why that strikes me when I made this was because I could never see a dish with eggs and yoghurt as the only star ingredients. (Unless… it was a face mask!) But there are always certain days in the calendar when the same old same old bore you to death and you want to try something radical  different! In my life those days are most days and I am willing to throw down the gauntlet of doubt in the face of strange culinary pursuits. (I know that’s dramatic but it’s a Sunday so allow me my self expression!) My guise was, I’ll keep the yoghurt separate and just ease one boiled egg into it to check for taste. Prototype A. If that passes quality check (i.e. my tongue) the rest of the eggs can join the party. So was the experiment successful? Let’s make that rhetorical. Would I post on the blog if the experiment was not successful? 😛 Serve this as an accompaniment to biryani or by itself with some pita. So here it is my darlings… Anda/ Egg Raita – To shock and amuse your guests and finally tickle those taste buds into taking a risk.  
Anda Raita/ Egg Raita
(Recipe from Miss Masala)
Prep time: 20 mins
Serves: 6
What you need:
6 hard boiled Eggs
750 gms Yoghurt (I use Nestle set dahi)
3 Tbsp Oil
½ tsp Asefodita/ hing
1 tsp Cumin seeds
1 tsp Mustard seeds
½ tsp Turmeric powder
4 dried long Red Chillies
10 Curry leaves
Salt to taste
Coriander leaves to garnish
What to do:
Cut the boiled eggs into half, set aside. Whisk the yoghurt till you get a lovely creamy consistency. Pour the yoghurt into the serving bowl and slide the eggs into it, yolk side up. Now you need to temper the yoghurt. Pour the oil into a small pan, set over high heat. When the oil is hot, lower the heat and then add in the mustard and cumin seeds. Wait for the mustard to splutter. Quickly add in the chillies, turmeric and curry leaves and watch it sizzle. Take it off the heat immediately and tip over into the bowl of yoghurt and eggs. Ta da!

How to get perfect hard boiled Eggs?
What’s a Hard boiled egg? a. The yolk should not be runny but just solidified, b. the yolk should not be rubbery and c. The yolk should retain a bright yellow colour and not get discolored around the edges. Room temperature eggs always work best for this. Also older the eggs the better they hard boil. Place the eggs in a pan. Fill with water till it just covers the eggs. Bring the water to a boil slowly. Now reduce the heat and let it simmer for 2 mins. Now turn off the heat, cover the pan with a lid and set aside for 15-18 mins. (Don’t ask me why 18 and not 20…this is a result of a lot of scientific experimentation). Now no peeking at all till the time is done. Seriously. Go read a book if you can’t resist being impatient! After 18 mins, pour out the hot water and refill with cold water. Count to a fifty. (just kidding now!). Then peel the eggs. There you have it -Perfectly hard boiled eggs!  
Note: You can store the boiled eggs within the shell in the fridge to be reused later. Please ensure you consume them wiithin 3-4 days.

Potato and Sausage Soup with Pesto

I resisted for a whole month. I did. Honest. Everyone says I make too many dishes with pesto in it. But…. I love Pesto! And how could I not start the New Year with another way to use the glorious green?! This time I added it to a soup. And not just any soup – the quintessential soup for the manly man. The meat and potatoes soup! It’s technically a main course, but since it’s eaten out of a soup bowl (albeit a rather large one) we’ll still call it soup. As with all things creamy and filled with carbs and meat – this is a hearty one. Meditate on the word – Hearty. It dosen’t just mean ‘filling’, it means something that will make you all loving and giving once you’ve eaten it. Seriously, have you ever seen someone deprived of Carbohydrates? Bitchy bitchy. But not with this soup … all the nastiness just melts into the bowl. Don’t believe me? Try wolfing down a bowl of this and go take a look in the mirror. Did you see the contented smile plastered across your face? There. (Atleast you’ll be an epitome of goodness till dinnertime.) Saving the world darling, that’s what I do best …

Potato and Sausage Soup with Pesto
Prep time: 10 mins
Cooking time: 40 mins
Serves: 4 as main course
What you need:
4 large Sausages (I used Chicken franks)
3-4 Tbsp Pesto (click here for recipe or use store-bought Pesto)
4 large/ 450 gms Potatoes
3 Onions, chopped
2 Tbsp Olive Oil
2 Tbsp Butter
2 ½ cups Chicken Stock
2 ½ cups Milk
100 gms dried Pasta (macaroni/ conchigliette/ spirali – any small shape)
2/3 cup Cream
Parsley, chopped – to garnish
What to do:
Par Boil and keep aside – potatoes and sausages. Peel and chop the potatoes into bite sized pieces. Chop the sausages as well – I prefer franks as they hold their shape in the soup. Heat olive oil and butter in a pan and fry the chopped onions for 4 mins, till cooked but not coloured. Add the stock and milk to the pan, bring to the boil. Toss in the potatoes and sausages and simmer for 12-15 minutes. Meanwhile cook the pasta according to the instructions on the packet and drain and keep aside. Blend in the cream into the simmering stock and simmer for 5 mins. Add the parsley and pesto (I like 4 Tbsp for a nice pesto hit) and combine well. Check seasoning and then adjust for taste with salt and some freshly ground black pepper. Fold in the cooked pasta and heat through for 2-3 mins.
Transfer the soup to individual serving bowls and serve with some freshly grated parmesan and garlic bread.

Roasted Red Bell Pepper Pesto

When we think of pesto the first thing that comes to mind is the Basil pesto. But pesto has now become a generic term for anything that is made by pounding ingredients in a mortar and pestle. So the original form – the basil one, is now called Pesto alla Genovese. (That will always remain my favourite, but I am not won’t of trying other versions to increase my repertoire of dishes.) The other popular one’s are the Red bell pepper pesto and the Sun dried tomato pesto. I always work with what I have in the fridge at any given point in time – and yes Bell peppers it was. Pestos as you know are super easy to make and keep well in the fridge under a layer of olive oil. So it’s always wise to make more than you need and pack away the rest in the fridge. When one dish has more than a couple of uses, it climbs the ladder of success pretty fast. (i.e. I make it more often and stash it in the fridge – Don’t you think that’s the epitome of success for an ingredient? :P) I use this one on baguette’s as a spread, as a dip for taco’s or toasted lavash and crudites and as an easy sauce for pasta. So keep this one handy – to impress your guests or to fill your belly on a hungry jam packed weeknight.

Roasted Red Bell Pepper Pesto
Prep time: 5 mins
Roasting time: 20-25 mins
Makes: 1 cup
What you need:
3 large Red Bell Peppers, seeded and cut into eights
3 Tbsp Olive Oil
3 large Garlic cloves
½ cup Cashews lightly toasted
1 Tbsp Balsamic Vinegar
¼ cup fresh Basil
Salt and freshly ground Black pepper to taste
What to do:
Preheat the oven to 190°C. Place the bell peppers on a lined baking tray and brush lightly with a little olive oil. Season with salt and pepper. Roast in the preheated oven for 20-25 mins., turning once or twice till the skin is blackened. (I use the top rack). Remove from oven, place in a ziplock bag (or bowl and cover with plastic film). When the capsicum has cooled, peel off the skins. (The zip lock bag helps seal in the moisture and helps in removing the skins easily.)
Place the roasted cashews, peppers, remaining oil and the rest of the ingredients in a blender and blend to a paste. (I like it a bit chunky).
Store in the fridge, in an airtight container. (A layer of olive oil on top helps store it longer).
P.S. I topped my pasta with 2 Tbsps of the pesto and some grilled Red pepper slices. Yum.