Why oh why do I gravitate towards recipes with pesto in it? a. What I thought was a chutney couple of years ago is now my favorite condiment. (Apart from Maggi Hot and Sweet sauce – you will always be my first love!). b. It has the most wonderful fresh flavor that can bring summertime running in! This one uses store bought pesto (for small quantities, making a whole batch seems unnecessary), but you can always use my Pesto recipe if you have the ingredients at hand. Sandwiches are looked upon as a snack in India but this one has enough going on for it to make it a light lunch. The co-resident said he would pay good money to eat this at a Deli, so I’m guessing it was good. Actually it WAS that good! So get your grill pan out (I bought a gorgeous one from Bergner… good definition) and start grilling. Yes, I don’t have a BBQ (sob sob) but beggars can’t be choosers or rather apartment dwellers can only dream of the joys of an open fire! But rest assured the grilling works rather well on the pan and if you want the grill lines to be prominent just keep a weight on the object to be grilled to push it down. Scar face would have been proud!
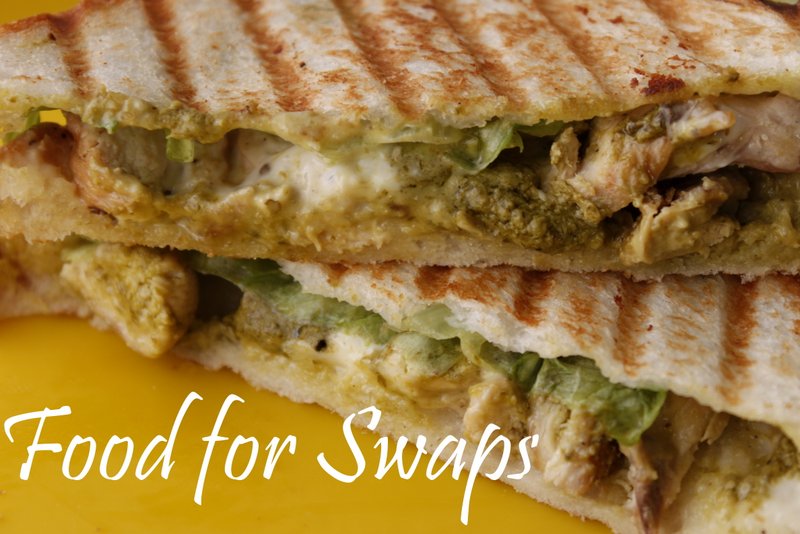
Grilled Chicken and Pesto Sandwich
Prep time: 5 mins
Cooking time: 10 mins
Serves: 4 as a snack, 2 for lunch
What you need:
8 slices of Bread or 4 Panini Rolls
1 Chicken Breast fillet
2 cups Lettuce or rocket leaves
4 Tbsp Pesto
4 Tbsp Mayo
Salt and freshly ground Black Pepper
Oil for grilling
What to do:
Lightly brush or spray a chicken fillet with oil, season with salt and pepper. Place on a BBQ or heated grill pan on the stove and cook over medium heat for 4-5 mins per side (depending on the thickness) till cooked. For more definition of the grill lines, press down with a weight. When pricked with a fork, the juices should run clear and the chicken must be opaque. Keep aside and slice the breast into pieces of ½ inch thickness.
Spread a Tbsp of Mayo on one slice. Place a generous quantity of lettuce on the other. Top with the grilled chicken breast and a Tbsp of Pesto. Season with salt and pepper. Sandwich together. I think this tastes best when the sandwich is toasted. (You can use a sandwich maker/ tava or grill pan.) Lightly spray the grill pan with some oil and press the sandwich down for about a 45 seconds per side till it looks golden and toasty. Hmmm….Yummy yummy yummy!
P.S. I really like the new Cooking Sprays. It’s slightly expensive but delivers the right amount of oil to coat the pan/ meat while grilling. You can always use a basting brush, but how fun is using an aerosol can?!